When you create an Azure SQL Managed Instance, backups are automatically enabled for all databases with a default retention period of 7 days. However, as the number of databases grows, managing backups becomes increasingly complex. It can be both time-consuming and error-prone to ensure that backups are correctly configured for each new database. In some cases, new databases might even be overlooked, leaving them without proper backup coverage.
You can use Terraform and Azure Automation Accounts to streamline and automate the backup process.
Automation Account Creation with Terraform: The Terraform code creates an Azure Automation Account within a specified resource group. This account will be used to host and run PowerShell/Runbook that automate backup configurations for Azure SQL Managed Instances.
Runbook Deployment: The script deploys a PowerShell-based runbook to the automation account. This runbook contains the logic to apply backup retention policies to all SQL Managed Instance databases. The runbook is responsible for:
Setting short-term retention policies (e.g., 30 days of backup retention).
The runbook is uploaded from a local PowerShell script (sqlmi.ps1) into the automation account via Terraform’s azurerm_automation_runbook resource.
Scheduled Execution: A daily schedule is set up using the azurerm_automation_schedule resource. The script is executed once a day to ensure that any new databases or changes to existing databases are properly handled. The schedule ensures the runbook runs automatically without manual intervention.
PowerShell Runbook Logic: The PowerShell script that runs in the Azure Automation Account performs the following steps:
Logs in to Azure using the managed identity of the automation account.
Retrieves all Azure SQL Managed Instances in the subscription.
For each Managed Instance, it retrieves the list of databases, excluding the system “master” database.
It checks the Long Term Retention (LTR) policy for each database. If the LTR policy is already set (in this case, 12 months), it skips that database.
If the LTR policy is not set, the script applies both the short-term (e.g., 30 days) and long-term (e.g., 12 months) retention policies to the database, ensuring proper backup configurations.
This ensures that every database in the Managed Instance has consistent backup policies applied.
If you are working in a team that have the overall responsibility for azure resources. But you also work in a large organization with lot of subscription and a lot of different teams that creates resources in azure. It can be really hard for you to find out who created the resources and who is responsible for it.
This is where tags can be used to easier keep track of resources and who is responsible for them, plus many other possible effects of tags. There might be situations or organization’s that don’t use tags or have not started to use tags.
This blogpost is about tags and how to add static tags to every resource group in a subscription or subscriptions.
Solution
This solution adds static tags to all resource groups in one or more subscriptions and keeps adding them every day so newly created resource groups also gets the tags. Example on static tags:
Tag Key
Value
owner
Who is the owner
team
what team created this resource
createdby
who created it (can be an email)
environment
Prod, Dev, Test
How to create the solution
Script that goes through/creates the steps 1 to 5 can be found here: Add_rg_aa_rbac.ps1
Script/json file for the role Tag Creator can be found here: tagcreator.json But remember to change to your management group
Activate Owner role on the subscription where the Automation Account should run on. (Add Tags)
Create a new resource group
Create a new Automation Account in the newly created resource group
Activate System assigned Identity
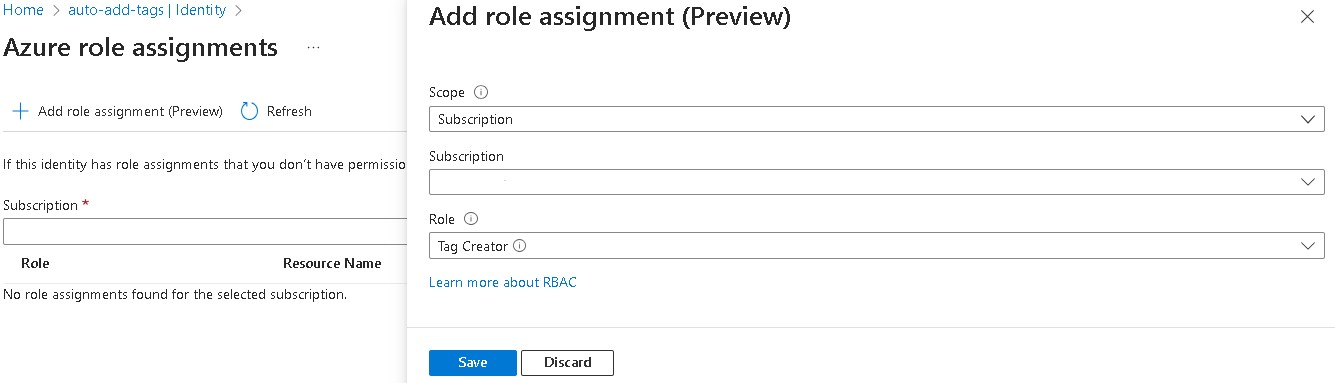
Click on Azure role assignments.
Add RBAC I have created a custom role you can use: Tag Creator see bottom. (But you can use for example Contributor) You can add the RBAC for the automation account to more subscriptions if needed. It should look like the image below.
Now on the Automation Account navigate to Runbooks.
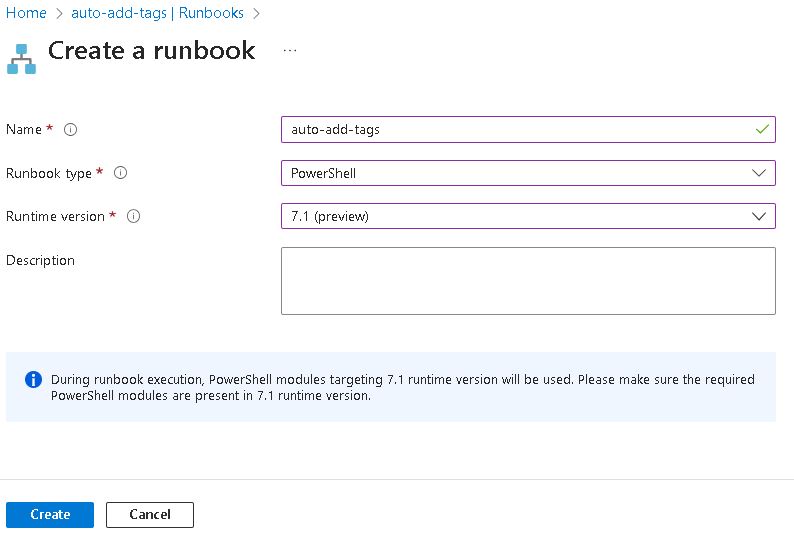
Click on Create a runbook
Give the runbook a meaningful name, set Runbook type PowerShell and Runtime version 7.1 (perview) and click Create.
Now copy the Runbook/script you can se bellow
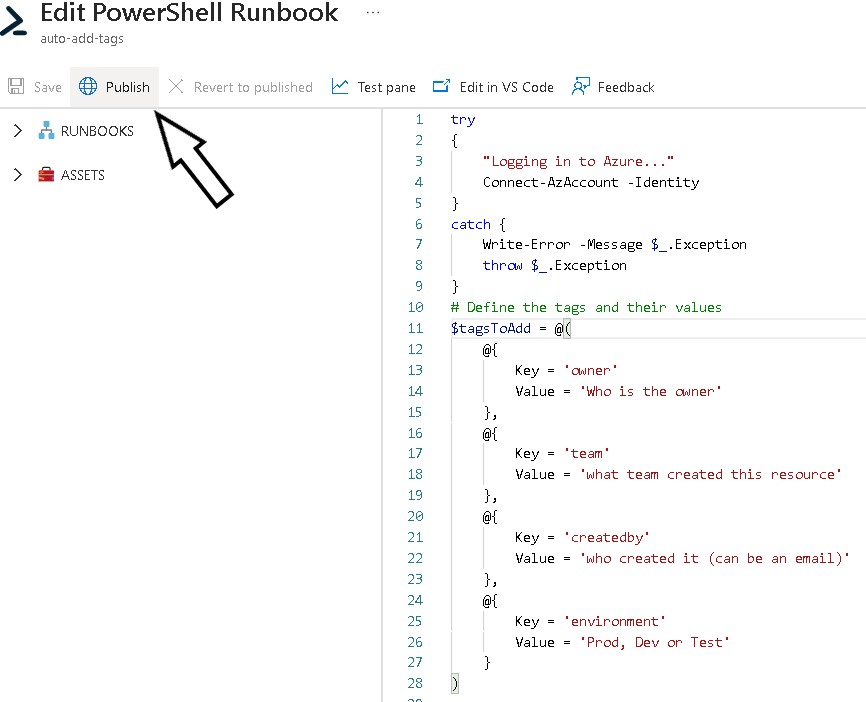
Change the tags or add/remove them. I have suggested few tags but change them to your needs. IT should look something like this:
Now if you want to try run the Runbook/Script you can click on test pane and Start. (This will add all the tags to all resource groups in your subscription)
If you are satisfied with the test run, then go back to edit the Runbook/script or want to continue click on Publish.
Now navigate to Schedules, click on Add a schedule.
Create a Schedule that suits your needs. Below is an example.
Conclusion
Now you have a Runbook/script that adds tags to all resource groups in your subscription and add the tags to new resource groups that are created in the future.
try
{
    "Logging in to Azure..."
    Connect-AzAccount -Identity
}
catch {
    Write-Error -Message $_.Exception
    throw $_.Exception
}
# Define the tags and their values
$tagsToAdd = @(
    @{
        Key = 'owner'
        Value = 'Who is the owner'
    },
    @{
        Key = 'team'
        Value = 'what team created this resource'
    },
    @{
        Key = 'createdby'
        Value = 'who created it (can be an email)'
    },
    @{
        Key = 'environment'
        Value = 'Prod, Dev or Test'
    }
)

<# copy this code but change the key and value to add more tags and add it to $tagsToAdd above!
,
    @{
        Key = 'extratag'
        Value = 'extravalue'
    }
#>

# Get all Azure subscriptions without displaying errors and warnings
$subscriptions = Get-AzSubscription -ErrorAction SilentlyContinue

# Iterate through each subscription
foreach ($subscription in $subscriptions) {
    if ($null -ne $subscription) {
        # Select the current subscription
        Set-AzContext -SubscriptionId $subscription.Id

        # Get all resource groups in the current subscription without displaying errors and warnings
        $resourceGroups = Get-AzResourceGroup -ErrorAction SilentlyContinue

        if ($null -ne $resourceGroups) {
            # Iterate through each resource group
            foreach ($resourceGroup in $resourceGroups) {
                if ($null -ne $resourceGroup) {
                    # Iterate through each tag to add
                    foreach ($tagToAdd in $tagsToAdd) {
                        $tagKey = $tagToAdd.Key
                        $tagValue = $tagToAdd.Value

                        # Check if the tag already exists in the resource group
                        if ($null -ne $resourceGroup.Tags -and -not $resourceGroup.Tags.ContainsKey($tagKey)) {
                            # Add the tag to the resource group
                            $resourceGroup.Tags[$tagKey] = $tagValue

                            # Update the resource group with the new tag without displaying errors and warnings
                            Set-AzResourceGroup -ResourceGroupName $resourceGroup.ResourceGroupName -Tag $resourceGroup.Tags -ErrorAction SilentlyContinue
                        }
                    }
                }
            }
        }
    }
}
If you are in the same situation as I was this can help you and your company to clean up old resources. We have some subscriptions where the whole company can try out stuff and just play with Azure. This kind of subscriptions is for labing and testing and the resources should be short lived.
Sadly, this kind of resources often gets forgotten and just stays there and cost money for the company and no one knows if this kind of resources can be deleted.
Solution
Just deploy the policy and add the RBAC for the Automation account on subscriptions where you know nothing of importance is running.
All the code for this auto cleaner can be found in this github-repo:Auto-Cleaner It is built out of two components:
A policy that adds a DeletionDate tag with plus 30 days to new resource groups. And adds the tag when an update is performed on a resource group with 30 days from current date to the tag. (It refreshes the date on the tag DeletionDate)
Automation account that deletes resource groups with the tag DeletionDate on current day.
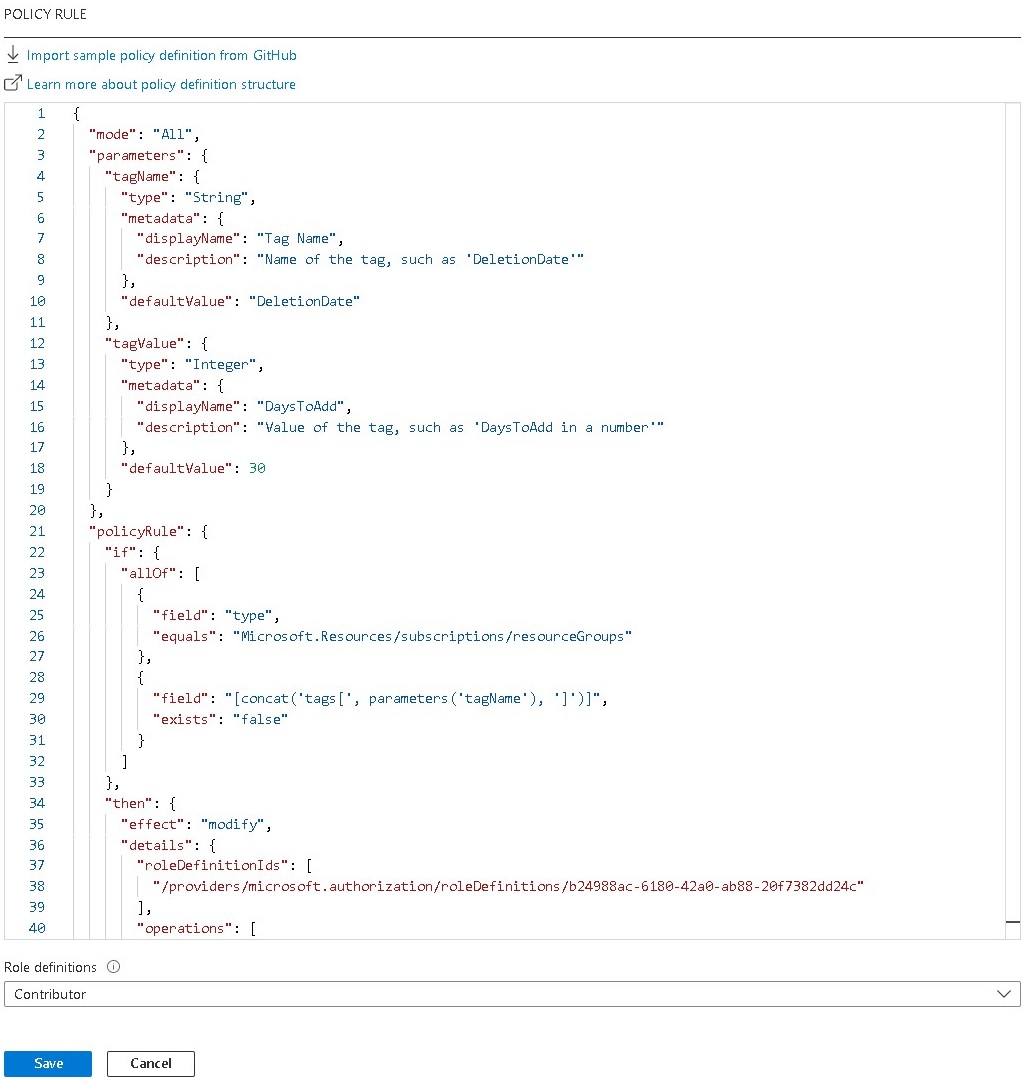
The Policy
The policy has two parameters: tagName = defaultValue: DeletionDate (string) tagValue = defaultValue: 30 (Integer)
The policy is of effect modify. This is because we then get the possibility to remediate old resource groups, so they also get the tag and ultimately gets deleted.
Deployment
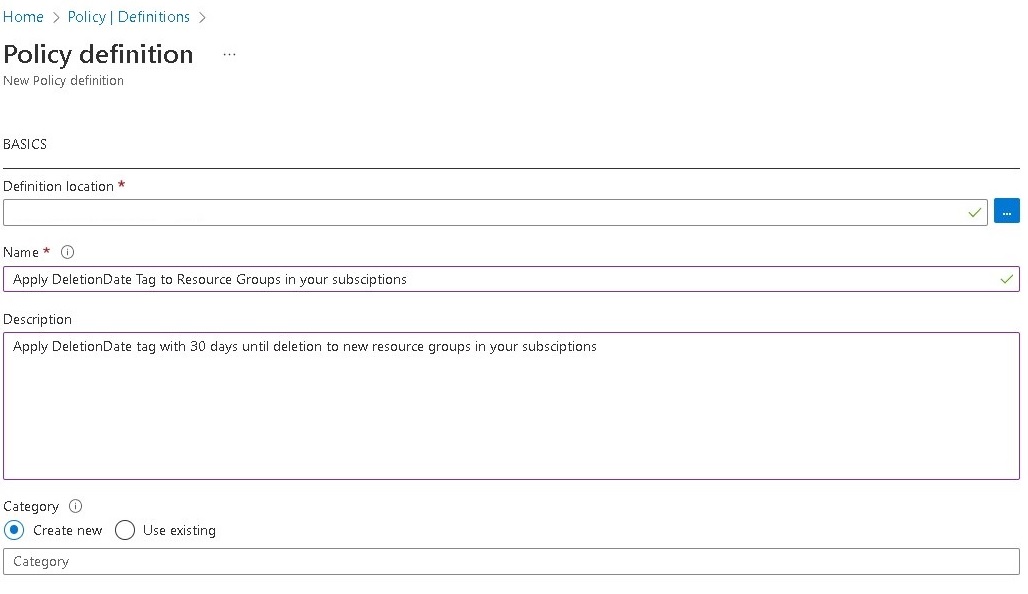
Open the Azure portal and navigate to Policy > Definitions. Click + Policy definition
Chose a location (Example under a management group or subscription)
Name the policy whatever you prefer.
add a Description.
Copy the content of file Copypolicy.json to POLICY RULE and Save If you need more time the 30 days change the value of ("defaultValue": 30) to your liking
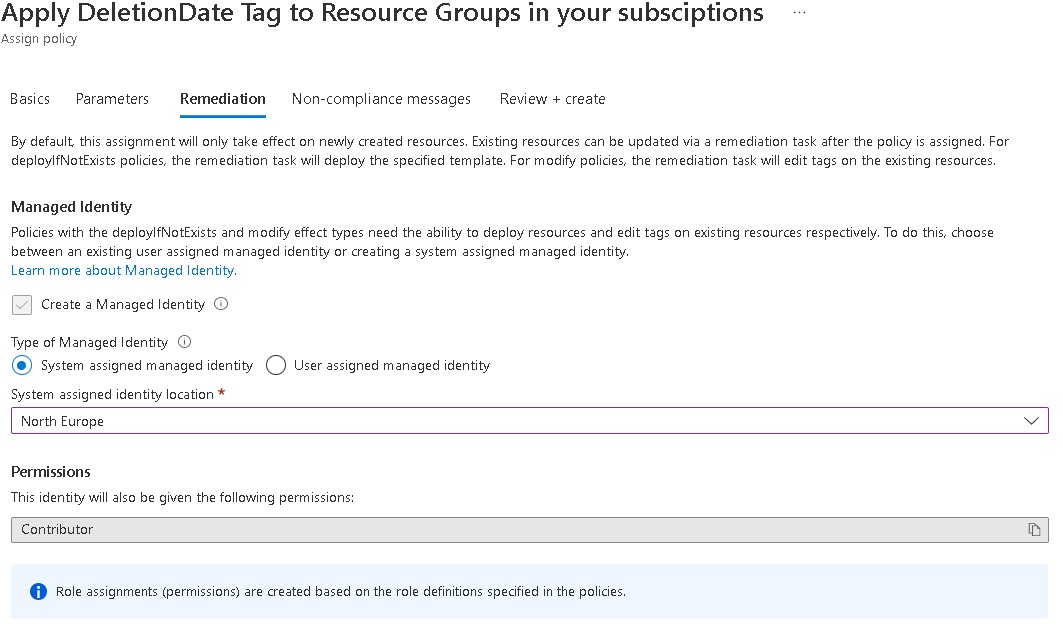
Now we need to assign the policy so click Assign
Scope the assignment to a Management Group or Subscription.
Give the assignment a name and Description and Enable it.
Under Remediation chose System assigned managed identity or create a User assigned managed identity.
Click Review + create > Create
You can test the policy by just creating a new resource group where you have scoped the policy assignment and see if it automatically adds the tag. If it does, then everything is working as expected.
Now if you want to create a Remediation task do it to add the tag to old resource groups.
The Automation Account
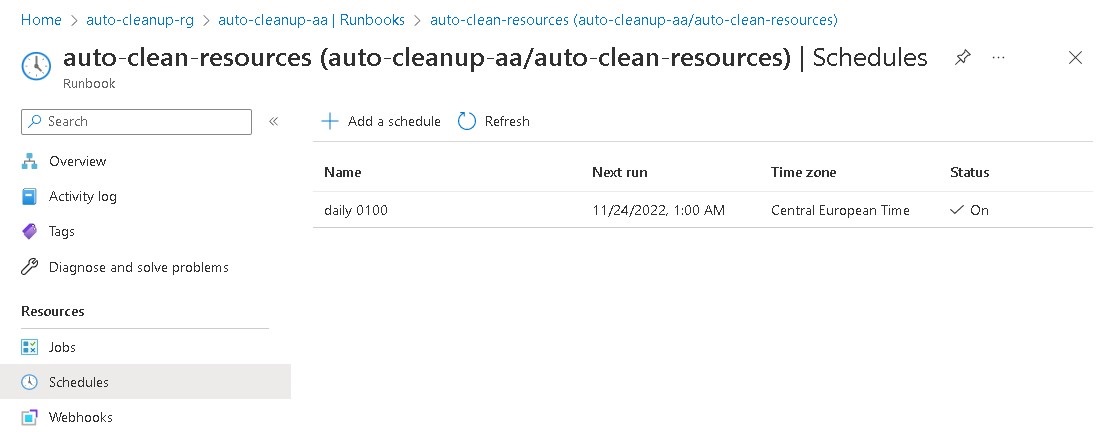
The automation account has one runbook that is scheduled to run at 01.00 AM every day. You can deploy everything as it is from the repo described below but you need to manually add the powershell scrip to the runbook. Or change runbookType: 'PowerShell7' to runbookType: 'PowerShell' in fileautomationAccount.bicepand just use the script import.ps1 in folder extra-config. (you need to uncomment (# $scriptPath and # Import-AzAutomationRunbook) Everything works fine with both PowerShell and PowerShell7 but you get more output/info from PowerShell7 so I would recommend it.
resource automation_account_auto_remove_runbook 'Microsoft.Automation/automationAccounts/runbooks@2019-06-01' = {
  parent: automation_account
  location: location
  name: 'auto-clean-resources'
  properties: {
    logActivityTrace: 0
    logProgress: true
    logVerbose: true
    runbookType: 'PowerShell7' // here you can go with PowerShell and use the import.ps1 script. powershell7 gives more info from the runbook but then you need to add the script manually.
  }
}
RBAC
The account or the service principal that deploys the automation account need the following RBAC roles on the scope of the deployment. For example, Contributor and User Access Administrator on the management group where you deploy the automation account.
Open the copied files/folder in visual studio code. It should look like this picture below.
Create a new repo and add a github action or just deploy it locally.
Deploy everything with commands like this: cd .\bicep-deploy\ az login az deployment mg what-if --management-group-id yourManagementGroupId --name rollout -f .\main.bicep -l westeurope az deployment mg create --management-group-id yourManagementGroupId --name rollout -f .\main.bicep -l westeurope
Add the auto-cleanup.ps1 script which is located in extra-config to the new runbook auto-clean-resources as seen in the picture below and Save.
Or run the script import.ps1 from folder extra-config or publish the runbook and add the schedule manually. It should look like this when its finished.
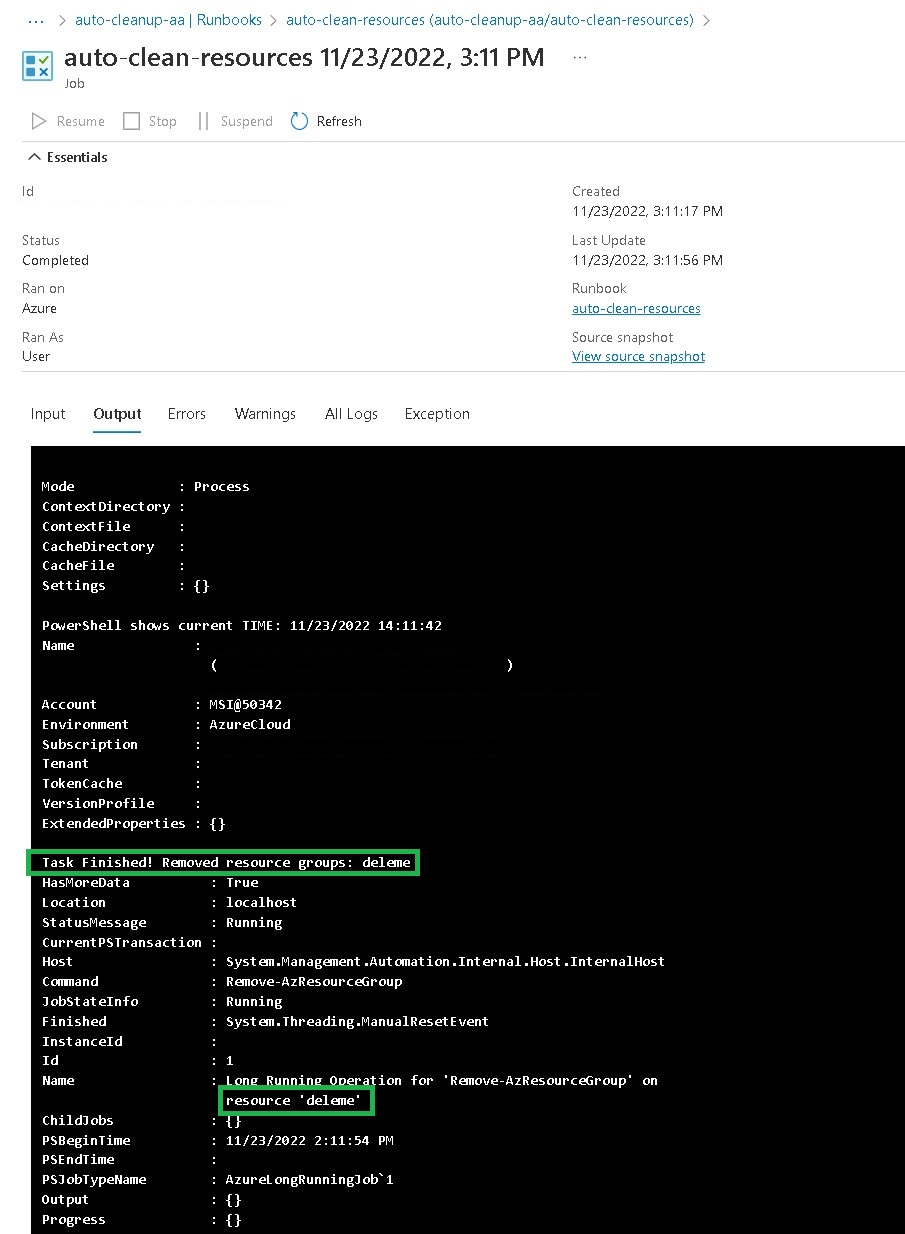
If you want to try it out create a new resource group and change the date on the tag DeletionDate to current date.
Start the runbook. The output should look like this.
Extra-config
In extra-config under policy there is an example on how you can deploy the policy just with code: policy It is also here we find the runbook script: auto-cleanup.ps1
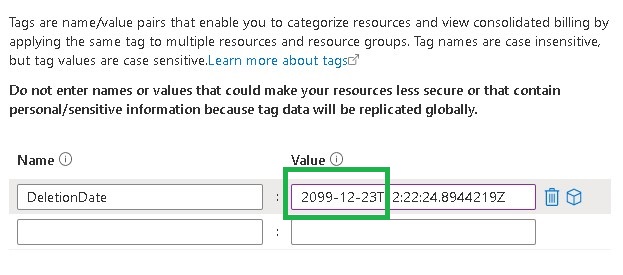
Protect resources from auto deletion
If for some reason you need to protect a resource group, just add more time to the tag as shown in the picture below.
SCEPman is a slim and resource-friendly solution to issue and validate certificates using SCEP. It is an Azure Web App providing the SCEP protocol and works directly with the Microsoft Graph and Intune API. I have used SCEPman together with RADIUS-as-a-Service for our offices to log on to our WIFI automatically. There are much more ways you can use SCEPman take a look at SCEPman docs. Reference: https://docs.scepman.com/ https://docs.radiusaas.com/ https://github.com/marfha88/SCEPman
This blog post is about the infrastructure, architecture and deployment of SCEPman with bicep. As most companies now use infrastructure as code (IaC) and SCEPman just gives us the starting point I wanted to share my deployment of SCEPman with bicep.
So, to get started SCEPman have a very smooth first deployment which sets everything up and also adds a resource that I can’t find a way to deploy with bicep (pid)
Run the bicep deployment to add your tags and to make sure that it works.
Open the SCEPman webapp and run the powershell script or runt it with the github action (more advanced and optional) deploy-powershell (powershell.yml) and change the scepman.ps1 script you find in extra-config from my github repo.
After you have run the scepman script a few new webapp settings have been created se the portal. Add the settings to your bicep code both for the webapp and for the webapp-certificatemaster. Webapp: Webapp-cm: Visual studio code:
Run the bicep config again and make sure you got everything right.
Now you have a basic SCEPman deployment in bicep and you can manage all the resources.
More advanced deployment nr2
This deployment will include alarm, Application Insightsand auto scale on the app service plan.
Do the same as in the first deployment but change to bicep-deploy-2
Run the bicep deployment to add your tags and to make sure that it works.
Open the SCEPman webapp and run the powershell script or runt it with the github action (more advanced and optional) deploy-powershell (powershell.yml) and change the scepman.ps1 script you find in extra-config from my github repo.
After you have run the scepman script a few new webapp settings have been created se the portal. Add the settings to your bicep code both for the webapp and for the webapp-certificatemaster. Webapp: Webapp-cm: Visual studio code:
Geo-redundancy and even more advanced deployment nr3
This deployment adds Traffic Manager, (certificate for https) deployment slots and update strategy.
Prerequisites:
HTTPS Certificate
Have your own domain (So you can add DNS records)
SCEPman licance
First: Determine what hostname/dns your SCEPman instance will have. mine had (scepman.fahlbeck.no) Second: Buy a certificate for your SCEPman instance Recommendation: Buy the certificate through Azure App Service Certificates so you can have everything in code plus certificate auto renewal.
When the prerequisites are done do the same as in the first deployments but change to bicep-deploy-3.0 Use my bicep code bicep-deploy-3.0 and change the necessary parameters so they match your company you can find the code here: https://github.com/marfha88/SCEPman/tree/main/bicep-deploy-3.0 After running bicep-deploy-3.0 This will add key vault access policy for “Microsoft Azure App Service” so you can import/create your certificate for SCEPman.
Now move on to bicep-deploy-3.1 and deploy everything. Use my bicep code bicep-deploy-3.1 and change the necessary parameters so they match your company you can find the code here: SCEPman/bicep-deploy-3.1 at main · marfha88/SCEPman (github.com) The deployment will show some errors, and this is because you need to verify your domain for both the web apps.
Verify your domains with DNS records (you find the info in the portal under App Service\Custom domains)
Run the deployment again.
Now Run the powershell script that the webapp will show. (If the script creates a new certificate web master webapp delete it)
Add all the app service Application settings in bicep.
Add the artifact to a storage account and point the web apps to that artifact as in bicep code bellow, WEBSITE_RUN_FROM_PACKAGE: 'https://${storageAccountName}.blob.${environment().suffixes.storage}/scepman-artifacts/Artifacts.zip'
The App services needs Storage Table Data Contributor role on the storage account
point the deployment slots to SCEPmans own artifact in bicep as bellow WEBSITE_RUN_FROM_PACKAGE: ArtifactsLocationSCEPman
You can find bicep for RBAC in extra-config
Hope this will help you in your deployment of SCEPman When I started out for our company there were a lot of small things, I needed to figure out regarding how to deploy the bicep code. So even if you don’t need to deploy SCEPman there might be some tips and tricks in the bicep code that you can use ☺️!
When deploying infrastructure as code I would absolutely recommend deploying it directly from github and that’s where the github action comes in to play. Github action is basically deploying your code and this article is about how you can create a github action and deploy your (in this article bicep code).
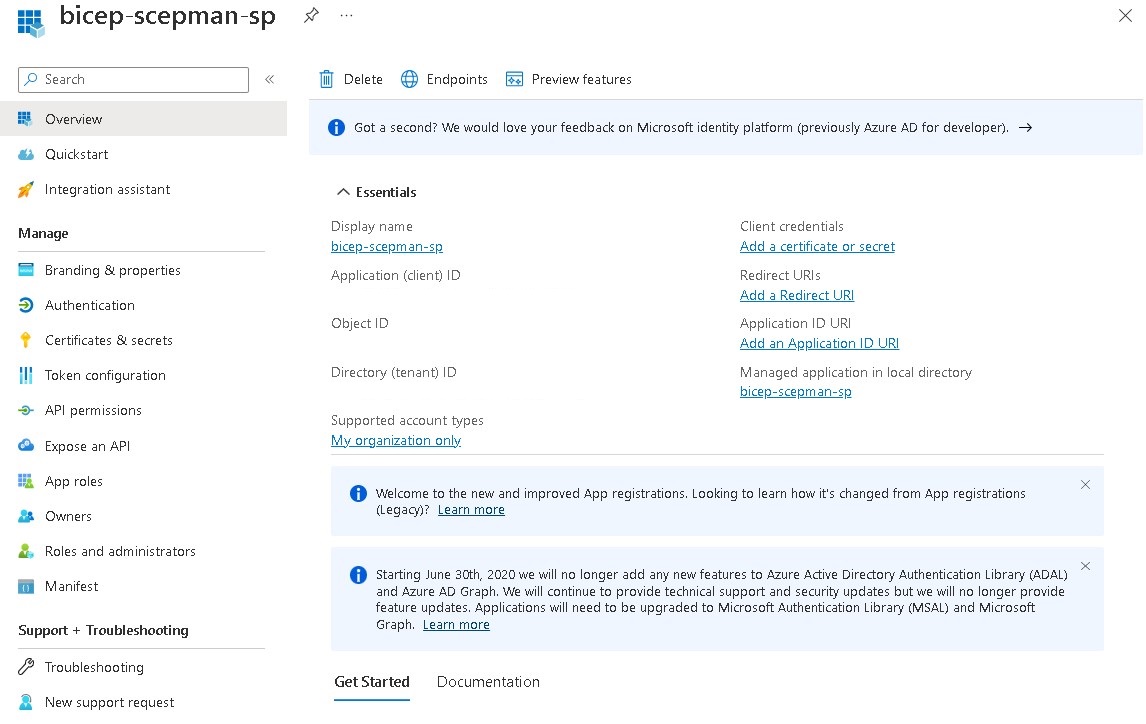
So, to start go to Azure Active Directory, App registrations and klick New registration
Give it a meaningful name (for this example i will use bicep-scepman-sp)
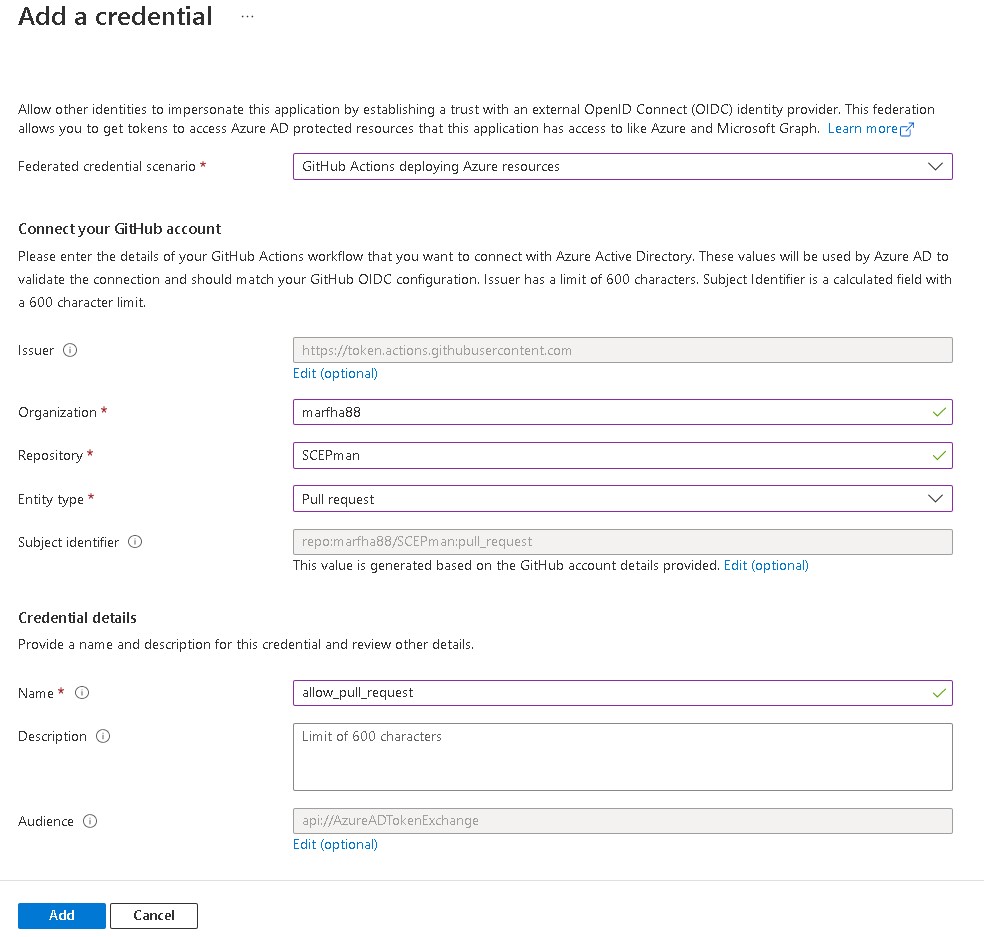
Go to Certificates & secrets, Federated credentials
Add at least 2 federated credentials with federated credential scenario: Github Actions deploying Azure resources.
Create the first credential as the following example. If you are in a github organization, write down that organization.
Create the second credential as the following example.
Now we need to add the RBAC roles that the new application registration/service principal needs to deploy your code/infrastructure. always try to use the principle of least access. But in this example, I added.
Contributor
User Access Administrator
Now that you have your application registration/service principal navigate to your github repo and open Settings, Secrets, Actions and add those 3 secrets:
AZURE_CLIENT_ID = Your application registration (Application (client) ID).
AZURE_SUBSCRIPTION_ID = Subscription where you’re going to deploy.
AZURE_TENANT_ID = Your Azure tenant id.
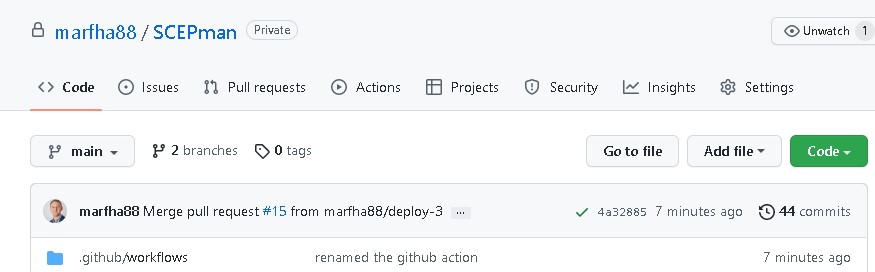
Now in your repo create the following folder structure: .github/workflows/ You can see how it should look at repo:
Copy the bicep-deploy.yml to your repo and place it in folder .github/workflows/ (as it does in this repo)
Open the file bicep-deploy.yml and change
paths to your path
az deployment group what-if -g (yourrg) –name rollout-$deploytime -f (to where you have located your file/files)
az deployment group Create -g (yourrg) –name rollout-$deploytime -f (to where you have located your file/files)
Change to your resource group (-g)
The lines you need to change on bicep-deploy.yml:
10 – bicep-deploy-1
16 – bicep-deploy-1
48 – resource group and bicep-deploy-1
57 – resource group and bicep-deploy-1
# This is a basic workflow to help you get started with github Actions

name: bicep-deploy

# Controls when the workflow will run
on:
  workflow_dispatch:
  pull_request:
    paths:
     - 'bicep-deploy-1/**' ## Change this to your deployment where your files is located
    types: [opened, reopened, edited, synchronize]
    branches:
      - 'main'
  push:
    paths:
     - 'bicep-deploy-1/**' ## Change this to your deployment where your files is located
    branches:
      - 'main'


permissions:
      id-token: write
      contents: read

# A workflow run is made up of one or more jobs that can run sequentially or in parallel
jobs:
  # This workflow contains a single job called "Bicep-Whatif-OR-Create"
  Bicep-Whatif-OR-Create:
    # The type of runner that the job will run on
    runs-on: ubuntu-latest
    steps:
      - uses: actions/checkout@v2
      - name: Azure Login
        uses: azure/login@v1
        with:
          client-id: ${{ secrets.AZURE_CLIENT_ID }}
          tenant-id: ${{ secrets.AZURE_TENANT_ID }}
          subscription-id: ${{ secrets.AZURE_SUBSCRIPTION_ID }}
      # Start the Bicep validation
      - name: Azure Bicep validate what-if
        if: ${{ github.event_name == 'pull_request' || github.event_name == 'workflow_dispatch'  }} # Here we run the what-if on a Pull request or manualy from Github Action
        uses: azure/CLI@v1
        with:
          azcliversion: latest
          inlineScript: |
            az bicep install
            deploytime=$(date +"%m-%d-%y-%H")
            az deployment group what-if -g yourrg --name rollout-$deploytime -f bicep-deploy-1/main.bicep
      - name: Azure Bicep Create via azcli
        id: scepmanbicepdeploy
        if: ${{ github.event_name == 'push' }} # Here we run the bicep create when we push the code to the main branch.
        uses: azure/CLI@v1
        with:
          azcliversion: latest
          inlineScript: |
            deploytime=$(date +"%m-%d-%y-%H")
            az deployment group Create -g yourrg --name rollout-$deploytime -f bicep-deploy-1/main.bicep
# You need to change to your resource group (yourrg) and bicep-deploy-1, bicep-deploy-2 or to bicep-deploy-1 depending on your deployment.
# Or just create your own deployment and copy what you need from this repo.
Now you have a simple Github Action that deploys on a resource group scope. You can of course scope it to: az deployment sub create – for subscription az deployment mg create – for management group
When you deploy new code/future always create a new branch and create a pull request with your new code. This will trigger a what-if action and a confirmation from the pull request when it has run you should confirm the result and confirm the pull request. When you confirm a bicep create will run and the code will be pushed to the main branch.
If you have the same problem as we had with cloud shell storage account scattered all over our azure platform. This post is about how you can move your cloud shell storage account to a new storage account. I would recommend that you guys keep it to one or two resource groups to not end up with the same problem anyway. We can also create a policy with denies the creation of storage account with the automated tag that gets added to the a cloud shell storage account “ms-resource-usage:azure-cloud-shell”
Move the files
Some users might have saved files thus as picture, script, connection strings and so on. If a user wants to cope the whole cloud shell, drive this is how you could do it. If a user don’t have anything that he or she wants to save simply follow steps nr 3-4 and 13 (delete the old storage account)
Copy paste cloud shell
Copy the name of the storage account to notepad or something else, you will need it later on.
Open cloud shell select bash and write: df
The storage account name will be seen as showed in the picture above followed by the file share name.
In the cloud shell write clouddrive unmount and say y as shown in the picture.
Now create a new cloud shell/Storage account in the subscription of you chose and the same for resource group. Name your new Storage account and fileshare to something meaningful. Example: cloudshellyourname
Now verify that the new storage account and file share is created.
When you have verified that the storage account and file share exist, from cloud shell now run clouddrive unmount and say y as shown in the picture shows above again.
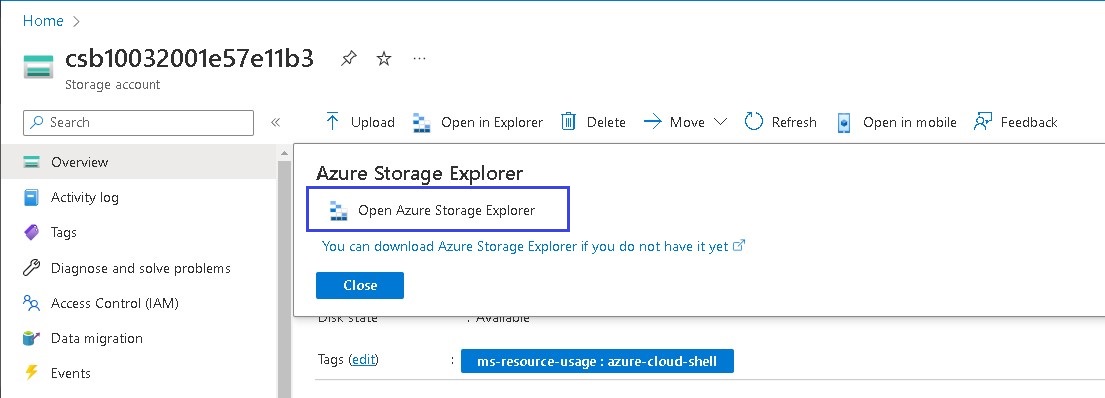
In the Azure portal navigate to the old Storage account and open: Open in explorer (if you dont have the application download and install it)
Login to Azure Storage Explorer and navigate to your old Storage account > file share > image and copy the image file.
Now navigate to your new Storage account > file share > image and paste the copied image file.
Replace the image file and Apply to All Conflicts
Now from the portal open cloud shell and attach the newly created storage account
Verify that the files are located in your new storage account/cloud shell. example command dir
I recently came across a problem that we have with our VMs that is protected through a Recovery Services vault. Our VMs is protected but there are a lot of manual steps that we need to do in the case of a disaster witch would be if our prime region goes down and our VMs gets replicated to another region.
For us this was to assign 3 ASG to the VMs NICs and if we did not do this they would not be able to preform what they are supposed to do because they lack network connection.
So I started to look in to the problem and found that within Recovery Services vault there is a function that can run runbooks from an automation account: Recovery Plans (Site Recovery) all right nice I thought.
So I created a new automation account and located it in the region where the VMs failover to I added the script/runbook that I have tested from PowerShell on my computer towards a test-failover VMs and the script added 3 ASG. On the automation account I enabled System assigned managed identity and gave that System assigned managed identity the RBAC it needed to execute the script and it worked. I also added a Connection in the automation account with the type Azure, give it a name, AutomationCertificateName, and add the subscription.
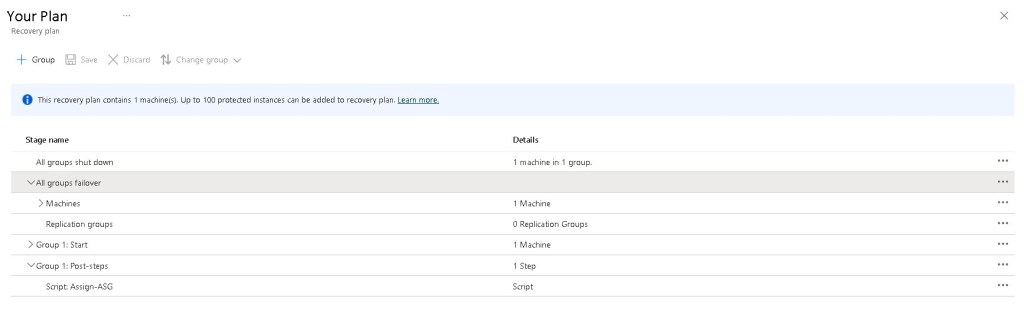
Back to the Recovery Services vault and navigated to Recovery Plans (Site Recovery) and created a recovery plan and add a step for me it is a Post-step and select script. Give the step a name chose automation account and chose runbook.
Now for the Recovery Services vault needs System assigned managed identity to be able to execute the script/runbook and also the same RBACs as the automation account plus Contributor on the storage account that cache the replication. Storage Blob Data Contributor on the storage account that cache the replication.
When all the RBAC is in place you can try a test failover from your Recovery Plans (Site Recovery).
Hopefully this works as as good as it worked for me.